Showing posts with label wedding decor. Show all posts

Monday, March 22, 2010

A magnificent mantle

So...remember my venue? If you recall, Mr. Buttons and I will be holding our wedding ceremony in front of Carlouel's huge stone fireplace...

(personal photo)


It is gorgeous on its own, clearly...but something was missing. Mommy Buttons and I were a bit perplexed as to why their fireplaces don't have mantles (there is a matching fireplace opposite the one we will be standing in front of for the ceremony)! I mean, that is pretty standard, right? And...there are such beautiful possibilities for decor with one!


Source


Source


Source


Source


At first, Mommy Buttons and I passed the idea of building our own mantle back and forth. Then, when we had a meeting with the club manager, my mom mentioned that we were thinking about constructing one, and asked if that would be ok with him. The response we received was unbelievable.


They...are...constructing...one...for...us!


Actually, they are constructing two mantles; one for each of the fireplaces. They will be removable, so the club manager will be able to use them in the future for different events - how cool! But, since they are being created for our wedding, he is building them based on our specifications/requests.


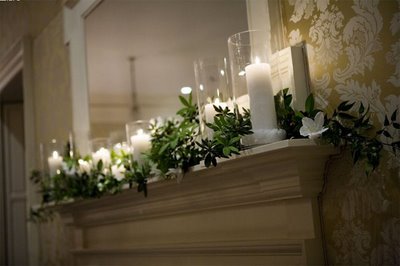
I wanted to jump up and down and do a happy dance when I learned the good news...and then began pondering how we will decorate our creation! At the moment, we are planning on filling it with large white pillar candles, as well as a lush display of flowers that match the bridal party bouquets! I can hardly wait to see how it all comes together!


Did you construct/have anything constructed for your wedding? What was it?

Thursday, February 11, 2010

Setting up the Gift Table

I want to make sure that we continue the whimsy of our décor on to the gift table! The one that Carlouel sets out is a very long rectangular table...and with so many OOT guests, I am not anticipating many gifts to be delivered in person on the wedding day. However, I really don't want the table to look empty, so I wanted to spice it up a little bit! I collected a few odds and ends, and I plan on arranging them in some way.

Here are a few of my trials thus far:

I found the "Love" sign at JoAnn Fabrics on sale for 40% off...$5! The blue pillar candle holder was also a JoAnn's steal...

The topiary was already sitting around my parents' house so I'm borrowing it (seriously people, go scour your houses and see if there are items you can use in decor!)...as well as the old books!

I ended up returning this particular birdcage (to be used for cards); I am going to continue looking for something a bit larger/more detailed, as I thought this one looked rather dinky, especially when it was surrounded by a bunch of other things. I also need to find some more vintage/old books. Any suggestions on where to find some?


Did you do something special/do you have something planned for your gift table?

Tuesday, February 9, 2010

Creating the Centerpieces

So, if you’ve been following along, you know that I decided on using baby’s breath for my DIY centerpieces, and that I scoured the stores to find a plethora of vintage-y vases.

Now, it was time to take them on a test run (please try to ignore my end-of-day nasty hair-do if you can)!


I purchased 3 small bunches of baby’s breath from Publix (they sell 3 bunches for $10). Each bunch included 3 stems. First, I cut the stems down (each stem has a number of smaller “branches” splitting off on each side), and then simply placed them in a vase until I achieved something that looked like this:

So simple, yet so pretty! Each vase requires an average of about 3 stems of baby’s breath. I was pleasantly surprised to see how full the vases looked with what seemed like 3 measly stems when I started!

But, we decided that we needed to make the process even easier, since we will have to assemble them ourselves on the day of the wedding. We tried out the method of securing the stems with a twist tie. Easy! We arranged the stems into a “pouf,” wrapped them with a twist tie, and then dropped them into the vase. This will work out well we hope! The plan is to assemble the poufs the night before/the morning of the wedding. We are starting to collect wine cases; each pouf (and its matching vase) will be placed in a slot for easy travel.

Source

Then, we will simply have to place each pouf into its vase when we arrive at the venue. Hopefully, this will save us time, as we won’t have to hang around the venue to assemble flowers the entire morning!


Did you take on a DIY with flowers? How did you go about transporting/arranging them on the day of the wedding?

Monday, February 8, 2010

Yes, I am certifiably insane…

A while back, I was browsing through the sea of wedding blogs on my reader, when I came across a rather inspirational series of photos on Style Me Pretty.

This table arrangement made me swoon…but of particular interest were the pretty paper pinwheels! How cute are these???


All images from Style Me Pretty.

I quickly wiped the drool off of my face, and began to think. This…is…do-able! I love the combination of whimsy and elegance the pinwheels create! After figuring out the logistics of creating them (sooo easy…a tutorial is forthcoming…I promise!), I decided to try out a few samples. It took a few to get the hang of it…haha!

I used some old scrapbook paper that was laying around the house (12”x12”), which I cut into 3” wide strips, and put in 1” accordion folds. 1” was CLEARLY too big…

After the first failed pinwheel, I decreased the accordion fold to ½” wide, and the result was much better! To finish the look, I added a button to the center…so cute!

After I made the larger pinwheel, I tried out a few smaller sizes as well, decreasing the pleats to ¼.” I thought they turned out well!

So…what am I going to do with these, you ask? First, the large pinwheels are going to be tied to the back of ½ of our reception chairs (every other one) in a similar fashion to what was pictured above. The medium sized pinwheels will become a part of the place settings/table decor. And, finally, the tiny ones will be used on our escort cards! According to my calculations, that means I have to make at least 300 pinwheels...gulp! I’m so excited about the final outcome…but am somewhat dreading the pain that my fingers are going to undergo during the folding process!

Next up, I’ll talk about my hunt for the perfect paper, search for hundreds of buttons, and provide you a tutorial on how to make your own pinwheels!


Did you stumble upon some DIY projects for your wedding somewhere on the Internet? What inspired you?

Wednesday, February 3, 2010

Revisiting the venue

During my trip home for Thanksgiving, there was a wedding at our venue. I was so excited that we were lucky enough to be home during a week with a wedding occurring! The manager told us that we could swing by during the early afternoon, before the guests started to arrive. I couldn’t wait to get there!

When we originally visited the venue, it was set up for normal day-to-day club activity. This time, it was in “wedding” mode. I was so glad to see the differences! Now, I’ll share some before-and-after pictures!

Remember the front entryway?

BEFORE:

Last time, it was filled with couches and a coffee table. For a wedding, they remove these and place a skirted table in the center of the room under the light fixture.

AFTER:


…and that…my friends…is where the wish tree guestbook is going to be placed!


Can’t you just imagine it? The tree will be the first thing that our guests will see as they walk through the venue’s door…

Also, behind and to the side are the skirted tables for the gifts, etc. I found some great items to decorate that space with…but I’m going to keep you in suspense until later…


There is a NEW addition to our venue since we last visited! Apparently, there was a wedding at Carlouel in October that used grapevines wrapped with white lights and votive lamps. The manager liked it so much, that he bought it from the florist, and it has remained up ever since! Unless a bride requests it to be taken down between now and the end of May, we are going to keep it in place. And, the manager was nice enough to tell us that they would put it back up for us if we wanted it and it had been taken down! Yay for free décor items!!! And, ooooh I’m drooling at the thought of how it will be lit up during the reception…so romantic!


Just to give you an idea of how it looks lit up (although our reception is at night)!!! So...romantic...


Last time we were at Carlouel, the “birdcage” area was set up for regular lunch-time pool activity.

BEFORE:


This time, we got to view the bar/cocktail hour setup! They set up a really nice large bar out by the pool, remove the tables and place them outside the covered area (and cover the tables with linens), and add a few tall pub tables. I’m digging the setup for our cocktail hour (now if only the weather would be perfect….)!

AFTER:

So, I am SO BEYOND excited about our venue after out visit! It really solidified how incredibly awesome of a choice we made. Sigh of relief, anyone???

With subsequent trips, did you just continue to fall more and more in love with your venue???

Monday, February 1, 2010

A Breath of Fresh Air...

Have you ever had a point in your wedding planning when you suddenly changed direction? I totally had that moment…let me explain…

To be fair, in regards to the florals involved in the wedding, I never really had the “perfect” idea. I see flowers…I think they are pretty…but nothing has essentially jumped out at me as being the flowers I MUST see on our tables or in bouquets.

Here was the original plan:

Hydrangeas, hydrangeas, hydrangeas.

I was drawn by the “poofy-ness” of them, if you will. Oh no, wait…the florist suggested these…I more or less agreed. Don’t get me wrong, I think they are beautiful…but…

I'd been thinking a lot about my DIY’ing…my mother and I have decided that we are going to tackle the centerpieces ourselves. And I am a nit-pick. Hydrangeas are known to be delicate, and die quickly. I started to worry about a wedding day hydrangea catastrophe. I can’t have partially brown flowers on our tables. I’d die.

Then comes the issue of price. Thankfully, with a DIY option, we can purchase flowers in bulk and save money by arranging them ourselves. However, flowers are still expensive…

***Screams angrily in frustration***

But then…I stumbled upon some amazing inspiration, and I’m hooked. And it is by the most unexpected flower imaginable.

Baby’s breath.

Oh my gosh…that’s right. I said it! For years I have despised baby’s breath…the extra little filler that they shove in bouquets…who needs it?!?!


But seeing these photos changed my mind…

Style Me Pretty

This wedding in Aspen featured puffs of baby’s breath hanging from the ceiling! Gorgeous!


Style Me Pretty

Even bouquets look gorgeous, and simple! Poofy and full and beautiful!


Following images from: Sedona Bride

This wedding was literally styled from top to bottom in baby’s breath! I’m in love…

I ADORE her bouquet...so romantic!


Following images from Mrs. Lemonade's wedding:


The little "bombs" are adorable!


So…what do I love about baby’s breath? It is cost-friendly (and I like to get a lot of bang for a buck), and I’m pretty sure that it will match my décor/theme well (birds, trees, whimsical, lighthearted…). Plus, I am hoping that it will be relatively easy and quick to set up as a centerpiece; score!

What do you think about using “filler flowers” as a part of your main décor?

Friday, January 22, 2010

Branches filled with love...

I have acquired a love of Manzanita branches…which will tie in nicely with the bird/tree décor inspiration that I’ve accumulated thus far! My biggest inspiration, and hopefully a huge focal point for our venue, is a wish tree guest book.

This is the initial photograph that sparked my interest…(you might recognize this as one of Miss Frozen Yogurt's inspirations as well!)

I love the idea of setting up the tree in a place where it will make a statement.

And I have the perfect location for it…


As guests arrive at Carlouel, they will walk into this front entryway. The couches will be removed, but in their place, we are placing a large table with the wish tree on top! Guests won’t be able to miss it, and they can take the opportunity to leave us a note either before the ceremony or during the reception.

I love that the tree will transform from bare branches to ones that are filled with beautiful papers replete with advice and well-wishes for our future! I’m going to have to scour some stores for crystal garlands (I’ve seen some great ones at Target around Christmas-time) to hang in the tree, and I’ll have to find some beautiful paper that the guests are able to write their messages on (and figure out the perfect size for them as well).

It’s a go! Now…I must shop for some of those dad-gummed Manzanita branches…