Showing posts with label wedding. Show all posts

Sunday, July 18, 2010

The Buttons Bachelorette: Relaxation, Excitement, and Slight Panic Sets In


After a day at the aquarium followed by a night on the town, the Button Bridesmaids and I decided that the next day would be one of relaxation. Well, sort of! We slept in a little later than usual, then quickly dressed and ran out the door to get to the nail salon.

We picked up some sustenance in the form of Panera sandwiches and coffee, and proceeded to the nail salon for manicures and pedicures. It was definitely nice to sit in a comfy massage chair for an hour or so...with the hustle and bustle of pre-wedding excitement, it can sometimes be difficult to take a moment to relax and take everything in. However, I highly recommend taking some time to yourself before your wedding day if at all possible!

After the nail salon, the Button bridesmaids and I headed over to my parents' house. Some of my relatives had arrived the previous afternoon, and I was eager to say "hello!" Do you remember how I mentioned that I had committed my relatives to slave labor on my behalf? Well, my mom, both my grandmothers, my aunt, AND my grandfather had been hard at work on our favors into the wee hours of the night. They must love me...

They look happy enough, right?


The idea for our favor came up randomly one night. I was at dinner with my parents, and we were discussing some wedding details. Mommy Buttons and I were commiserating about the situation. The original idea was to bag up some yummy key lime cookies from a local bakery. However, something about it was just not exciting us. Then, out of nowhere, Daddy Buttons came up with a brilliant idea! If you recall, Mr. Buttons and I met because of our pups. When I was a kid, Mommy Buttons used to make a delicious snack called "puppy chow" all the time - a combo of Crispix cereal, peanut butter, chocolate, and powdered sugar. Why not bag up some "puppy chow" for our guests as a nod to the furry friends that brought us together? The decision was made on the spot. So, a few days before the wedding, my family members were wrangled into melting peanut butter and chocolate, shaking bags filled with powdered sugar, and portioning each treat into white coffee bags that I had affixed monogrammed stickers to.

Things were incredibly busy at the Button household when we arrived; bags had to be packed, supplies had to be delivered, and we still had an important appointment to go to that afternoon! Do you remember how I said my florist would give me a flower preview? It was time for mine! When we walked into my appointment, I was bracing myself...even though I knew that Debbie had a firm grasp on my vision, I was very anxious to see if it was realized!

Oh boy, was I ever excited! As soon as my eyes landed on our flowers, a huge grin spread across my face. They were perfect. No, more than perfect, if that is even possible! Ok, so I am going to go ahead and spoil my pro pics by showing you my flowers now...but I just can't help myself! Can you see why I was about ready to jump for joy?

Fun fact: I don't know that we ever discussed the size of my bouquet in our meetings. My bridal bouquet was LARGE and IN CHARGE! Seriously: look at it next to me!
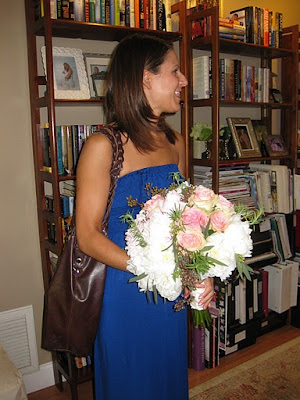

However, it was perfect. Absolutely perfect. The peonies and cabbage roses looked stunning together, especially with the seeded eucalyptus.


Debbie even added sprigs of rosemary, as it is a calming herb (and what bride doesn't need a little bit of calm on her wedding day?). The bridesmaids' bouquets turned out beautifully as well; they were created with cabbage roses, creamy stock, lisianthus, white cymbidium orchids, and seeded eucalyptus.


Gorgeous. I pretty much did not want to leave my flowers at that point; I was infatuated. But alas, there were things to do and people to see, so BM L, A, and I headed back to Clearwater. Bye bye my lovelies...


On the way back to the beach house, I took BM L and A through some back roads near the water. It was a lovely scenic drive. I also wanted to point out to them where our rehearsal dinner was going to take place the following evening. When we drove through downtown Clearwater, I saw the restaurant up ahead. As we passed by, I made a comment that something looked strange...but I couldn't put my finger on it.

Little did I know what was to come...

Sunday, February 28, 2010

Light it Up!


If you’re not already following along with the creation of my centerpieces…first I accumulated my vases, then I went through a trial run with the baby’s breath.

Next, I assembled a few samples!

In addition to my vase-purchasing frenzy, I also cleared TJ Maxx and Marshalls on any and all of these adorable little bird figurines. I now have a rather sizeable flock!

I wanted to create the ambiance/arrangement that we will have the evening of the wedding. Ideally, the lighting will be low and the reception tables will be illuminated with votives. Perhaps like this?

Aren’t the little birds adorable?

I plan to use one tall vase and one short vase in the arrangement. I’ll add a bird on one side, and the table number/letter on the other. Votives will be scattered around the table.


So…what do you think? Did you have an easy time turning your visions into reality for your reception tables?

Thursday, February 25, 2010

Wedding Related Dreams

I know that I can’t be the only one out there…right?

Source

It is my wedding day. For some reason, it is night, and everyone is getting ready for the event at a large mansion by the beach. I walk down a hallway to where Justin and his groomsmen are getting changed, and am horrified with what I see!


Source

The guys are all clad in bright blue and apple green plaid jackets, blue pants, and their boutonnières are simply a singular leaf pinned to their lapel. The horror!!! They looked ridiculous. Mr. Buttons doesn’t seem to think that anything is wrong, but I shift into panic mode and instantly grab my phone. I frantically call the suit rental place and lay into them for delivering us clown suits!

The suit place apparently doesn’t have any replacements, so I make the boys take their coats off to salvage the look.

Then, I realize that I didn’t remember to order flowers for the bridesmaids or myself…I begin crying.

And then…I start to wonder where my photographer is…shouldn’t I be getting ready at this point? I walk down to the kitchen to investigate. He isn’t there. I suddenly realize that in my stupidity, I forgot to give him directions! So, I pick up the phone and begin to dial the photog's number. My dad walks in to the room and stops me. Apparently he doesn’t want me to give out the directions, and takes the phone away from me. I yell at him and then storm off to another room to take a shower and get ready.

Except…I never got my dress altered. It is about 2 feet too long, and it is so wide that it falls right off of me. And, for some reason, my hairdresser went MIA, and she never showed up. I turn to the mirror and see myself standing there…in a dress about 4 sizes too big, with dripping wet hair and no makeup…

Getty Images

…and then I woke up. Thank goodness!

At first, I just laughed at my crazy brain/unconscious mind...and then the dreams continued to happen. There have been 3 now!

I’ll spare the nitty gritty details of the dreams that followed, but they seem to all have an overarching theme; for some reason I keep dreaming that I haven’t managed to finish all of my planning, or that I forget some important details involved! Eek!

For those of you who don’t know, I majored in Psychology…don’t get me started with dream interpretation! I could be Freudian and go into the latent meaning of the dreams (what you would essentially look up in a “dream dictionary”), but I honestly don’t believe that those serve much purpose. If you look up what seeing a U.S. Mail Box in your dream means…apparently it signifies that you are going to be involved in some illegal activity. What?!?! Who makes this stuff up? In the end, in my opinion I tend to think that my unconscious mind is nagging at me to make sure I get things accomplished. There is such a long to-do list involved with wedding plans, and I know that I’ve been fretting over whether or not I’ll get things done on time! Hopefully, these dreams will dissipate as time goes by…

Have you had any bizarre wedding related dreams?

Friday, February 19, 2010

100 days...


Source


Holy moly...lets take a deep breath here...


My lovely little wedding countdown has just informed me that we have 100, yes one hundred, days left until the wedding!


Wow...this means that as of tomorrow, we are officially in the double digits of our countdown to the big day. OMG! When we originally started our planning, it seemed like that ticker was at an impossibly high number, but now it seems like we are getting down to the home stretch!


100 days is still a decent amount of time to accomplish some things...and today really made me realize that I need to kick it into high gear!


Mommy Buttons and I made an extensive to-do list during our 13 hour car ride from Virginia to Florida last weekend (oh yeah! That's right...surprise! I now live in Florida again - goodbye snowy north, I will not miss you!). I was hoping that it would only take a short amount of time to brainstorm, but I realized after about 4 hours of wedding chatter that the list is relatively lengthy, and I need to buckle down!


What do I need to do, you ask?

  • Secure a baker. Oh yeah, I'm wayyyyyy behind schedule on that one, but I blame the fact that I've been in Virginia, and there really is no way for me to taste cake from that distance! I'm good at making excuses...
  • Meet with the florist to fine tune our flower plans
  • Get my dress fitted
  • Schedule hair and makeup trials (I'm kind of freaking out about this one...)
  • Help my mom (and grandma) shop for dresses
  • Send the invitations (thankfully, they are about 90% finished at this point; I can't wait to share them with you!)/create layout for reception/make seating chart
  • Complete the 1,452,236 DIY projects that I have semi-started, but failed to bring to fruition (pinwheels, escort cards and box, guestbook tree, programs, menus, OOT bags...are you still reading? I could go on...)


Now, this is not an exhaustive list by any means, but it was enough to get me off my butt and start getting things done! I'm hoping to report back some positive activity now that a fire has officially been lit under my behind!


Did you fear/are you fearful of reaching the 100 day mark on your wedding countdown? What big tasks do you still have left to complete before your wedding?


Tuesday, February 16, 2010

Smelling Sweet

Like many other Bees, I am obsessed with scents! Whenever someone doesn't know what to purchase for me as a gift, one of the default suggestions I give is for a new perfume/body spray/etc. I know I probably sound insane, but I most certainly change up the scent that I wear depending on the time of day, the outfit I'm wearing, or the mood I'm in! I have gathered quite the collection over the years...including:


Victoria's Secret PINK: This was one of the first perfumes I ever bought back in high school. Awwww. I love how fun and playful it is. It has been one of my go-to's for a sunny and happy day.

Source


Lacoste Inspiration: This particular scent reminds me of baby powder. It is extremely light. I tend to wear this on the weekends when I am running around doing errands.

Source


Lovely by Sarah Jessica Parker: Definitely one of my all time favorites! It is so feminine and floral. When I bought it, this scent quickly became my go-to perfume, and I ended up wearing it almost every day until I only have a few drops left in the bottle! It is currently on my "refill list" of perfumes I hope to be gifted if someone asks for a suggestion....haha!

Source


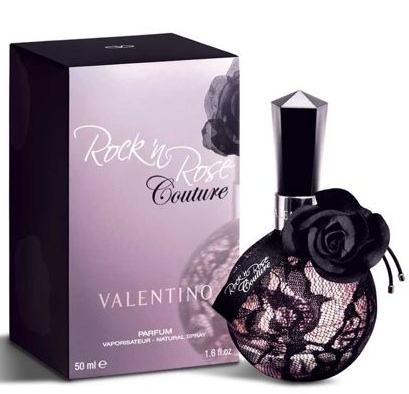
Valentino Rock n' Rose Couture: Ohhhh this one is just so incredibly sexy! It is my "night time" scent for an evening out. And...the bottle is just gorgeous, no?

Source


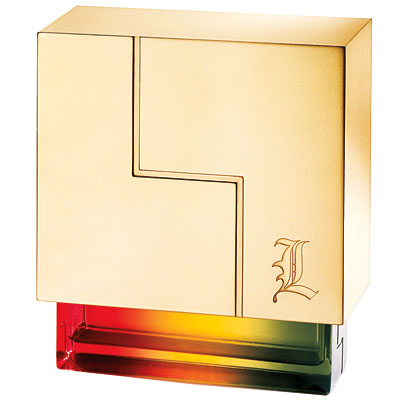
L.A.M.B.: Gwen Stefani's fragrance was my replacement for Lovely when I started running low...it is a fantastic "everyday" scent...it isn't quite as floral as Lovely, but I absolutely can't get enough of it!


Source


Ok, so clearly I have an arsenal of fragrances (and this isn't the complete list, sadly...), but which one do you end up wearing on a wedding day???? What a conundrum! I was talking to Mr. Buttons about it a month or so ago, and mentioned that it would be really awesome to select a new scent to wear on the day of the wedding...and it would be really special if he picked it out as well (or at least helped me)!


Well, as it usually is with Mr. Buttons...ask and you shall receive! No...seriously...I really do have to be careful what I ask for in front of him, because HE LISTENS (***GASP!!!!***). I was oogling a bikini around my birthday last year...BAM! It arrived at my doorstep in a box. The pearl earrings I wanted? PRESTO - Valentine's gift last year! The DSLR that I was coveting for Christmas? WHAM! My jaw dropped when I tore open the box on Christmas Day.


Valentine's Day this year....

Source


I die. Mr. Buttons for the win! I tell him he has to stop spoiling me, but at the same time I can't help but glow because of all that he does for me. He listened when I was making comments one day about perfumes I was interested in, and then took a trip to the mall after work, smelled a few of my top picks, and selected Coco Mademoiselle by Chanel. And...it is a perfect bridal scent in my opinion! It is feminine, floral, and the bottle is gorgeous! I absolutely adore it, and knowing that Mr. Buttons picked it out for me makes it that much more special! I currently have it hidden away in a drawer so I am not tempted to use it before the wedding...it smells so...darn...pretty!


Do you have your wedding day fragrance selected? Are you using one that you already have, or buying a new one to celebrate the occasion?

Friday, February 12, 2010

Miss Buttons' beauty secret: zapping zits!

When it comes to clear skin, I am obsessive. I dread the thought of waking up on my wedding day with an enormous zit on my forehead (My Big Fat Greek Wedding, anyone????)! Oh, the horror!!! So...how do I combat this?

I know that there are many little tricks out there to get rid of zits quickly (toothpaste? Windex?), but years ago I became absolutely hooked on a product by Mario Badescu.


The drying lotion is an absolute essential to have stocked in my medicine cabinet. I don't have to use it every day, but it gives me peace of mind to have it around when my face requires it! The solution will shrink/heal white heads overnight…it is amazing! You simply dip a Q-Tip into the bottle, then apply directly to the zit that you are zapping!

Although it will be an investment of $17 for a 1oz bottle, it is worth every penny! Typically, I only have to buy one every 4-6 months, so it does last a while! I can sleep easy at night knowing that any pesky zits I may have will be reduced or eliminated in the morning!


Do you have a skin clearing solution that you live by?

Thursday, February 11, 2010

Setting up the Gift Table

I want to make sure that we continue the whimsy of our décor on to the gift table! The one that Carlouel sets out is a very long rectangular table...and with so many OOT guests, I am not anticipating many gifts to be delivered in person on the wedding day. However, I really don't want the table to look empty, so I wanted to spice it up a little bit! I collected a few odds and ends, and I plan on arranging them in some way.

Here are a few of my trials thus far:

I found the "Love" sign at JoAnn Fabrics on sale for 40% off...$5! The blue pillar candle holder was also a JoAnn's steal...

The topiary was already sitting around my parents' house so I'm borrowing it (seriously people, go scour your houses and see if there are items you can use in decor!)...as well as the old books!

I ended up returning this particular birdcage (to be used for cards); I am going to continue looking for something a bit larger/more detailed, as I thought this one looked rather dinky, especially when it was surrounded by a bunch of other things. I also need to find some more vintage/old books. Any suggestions on where to find some?


Did you do something special/do you have something planned for your gift table?

Wednesday, February 10, 2010

DIY pinwheels…

Previously, I showed you my pinwheel inspiration, and my first attempts at the project. Today, the tutorial!

First, I searched high and low for the paper I wanted to use. Ideally, I would use scrapbook paper because of its thickness/sturdiness. At first, with 300+ pinwheels to make, purchasing scrapbook paper at 60 cents a sheet (or buying one sheet a week with a 40% off Michael’s coupon), seemed too costly AND time consuming. It seemed like I was on an endless search for paper, and originally found one solution in the least likely of places…THE DOLLAR STORE!

Yes, no lie! I was walking through the Dollar Tree to find something, and I walked by their gift wrap section. They had bins filled with wedding-related gift paper, and I started digging though the containers like a scavenger. What I came out with was…this!

It is ivory paper with a platinum/silver floral print. I purchased the roll and brought it home. When I set it next to our centerpiece vases, I was pleasantly surprised! It coordinates amazingly!

So, lets get started!


1.) I used a yard stick to measure out a 3 inch wide strip of paper.

2.) Next, I cut the strip to measure 12”x3,” which left a 6”x3” extra piece…which I cut down further to make two 6”x1” strips for a small pinwheel!

3.) For the larger pinwheel, I made ½” accordion pleats*. I was left with two accordion strips.

4.) At the end of one strip, I squeezed a small line of 3-in-1 Advanced Craft Glue (the fast drying stuff…although you could use tacky glue if you want…I like instant gratification though!), and then connected the two strips into one long one.

5.) Leave the strip to dry for a minute, and then connect the two exposed ends together. You will be left with a crinkly circle…it kind of reminds you of one of the coffee cup sleeves you get at Starbucks!

6.) When that dries, it is time to flip the paper into a pinwheel! I place my thumbs on the top of one end, and my other fingers on the other side, then twist my wrists so my thumbs come together. This part, at first, made me really nervous, but once you have the paper flipped, you are able to fix the edges/refold any pleats that you might have stretched out.

7.) Add a generous dot of glue to the center of the pinwheel to hold it together. Let dry.

8.) Finally, place a dot of glue on the back of a button, and set it in the center of the pinwheel. And…voila!

Now…I’m going to repeat this x300…

If you are looking to create some pinwheels of your own, this can be one of the most cost effective projects to dive into! The wrapping paper I purchased is 15 square feet, and according to my calculation, I will need 5 rolls, so I bought 6 to be safe...which came out to a grand total of $6.42 for all of the paper! In an ideal world (like I already said) I would use scrapbook paper because it is much sturdier, but I think that wrapping paper is a great alternative option! My grandmother has TONS of buttons at her house, and she sent me a box of them for the centers, so that aspect of my pinwheels is free! I purchased the glue at Michael's with a 40% off coupon for less than $3. I might need to purchase an additional bottle as I get farther into the project...but I'm not too worried about it at this point!


How are your DIY projects coming along?

*For my smaller pinwheels, I used ¼” accordion pleats. You might need to try out a few different widths before you find what you like!

Tuesday, February 9, 2010

Creating the Centerpieces

So, if you’ve been following along, you know that I decided on using baby’s breath for my DIY centerpieces, and that I scoured the stores to find a plethora of vintage-y vases.

Now, it was time to take them on a test run (please try to ignore my end-of-day nasty hair-do if you can)!


I purchased 3 small bunches of baby’s breath from Publix (they sell 3 bunches for $10). Each bunch included 3 stems. First, I cut the stems down (each stem has a number of smaller “branches” splitting off on each side), and then simply placed them in a vase until I achieved something that looked like this:

So simple, yet so pretty! Each vase requires an average of about 3 stems of baby’s breath. I was pleasantly surprised to see how full the vases looked with what seemed like 3 measly stems when I started!

But, we decided that we needed to make the process even easier, since we will have to assemble them ourselves on the day of the wedding. We tried out the method of securing the stems with a twist tie. Easy! We arranged the stems into a “pouf,” wrapped them with a twist tie, and then dropped them into the vase. This will work out well we hope! The plan is to assemble the poufs the night before/the morning of the wedding. We are starting to collect wine cases; each pouf (and its matching vase) will be placed in a slot for easy travel.

Source

Then, we will simply have to place each pouf into its vase when we arrive at the venue. Hopefully, this will save us time, as we won’t have to hang around the venue to assemble flowers the entire morning!


Did you take on a DIY with flowers? How did you go about transporting/arranging them on the day of the wedding?